Showing posts with label technology. Show all posts

Tuesday, March 17, 2020

Behind the scenes at SSuite Office Software...

SSuite Office Software Unplugged...


Many people who visit our website and use our free software applications don't realize that we develop our software after hours and in our spare time. We have normal day jobs just like everybody else...

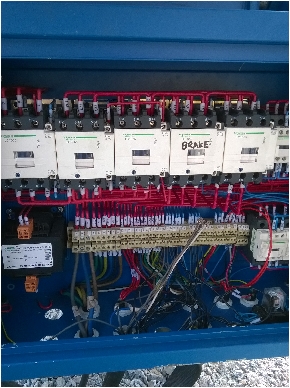
My brother and I work as Electrical Maintenance Contractors. To be more specific, we do new installations and maintenance of heavy mechanical engineering machinery and equipment.


Below is just a short description on one of our projects that we were contracted to do...


In the beginning...

We have just completed the first phase of a construction project in the local industrial area where we live.

Below are the cranes we finished wiring and are hoisting in place at a new engineering workshop.


SSuite Office         SSuite Office


We still have a long way to go... we have just finished working on four cranes, the other two are not visible in the above shots. We are now waiting for the floor and roof to be finished, there after we need to install and wire all the cables and distribution points inside the workshop.


To follow our whole progress on this massive project, have a look at the below installments that I've created.


Part 2

Below you will see the next stage in the construction of the engineering building we are currently working on.

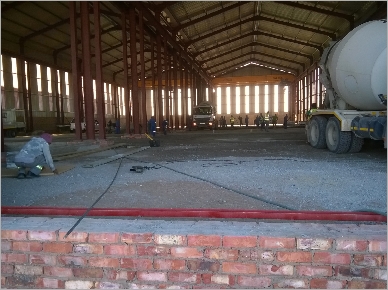
The roof is up and they are now filling up the floor with concrete and creating the cable trenches...


I will keep you posted as we proceed to install the main cable and switching gear for the electrical distribution.


Part 3

Below you will see the next stage in the construction of the engineering building we are currently working on.

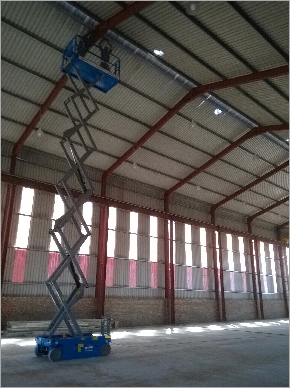
Now that the floor has been done and finished, we were allowed to start installing the workshop bay lights. This must have been the most uncomfortable and scary work I've done in a long time... check this out!   Nearly 40 feet of pure death waiting for me at the bottom...


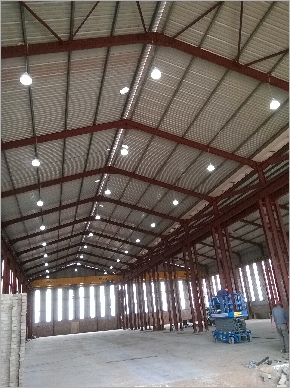
It took us exactly 5 days to wire and install 60 high-bay lights into the two workshop bays, but we finally finished and all the lights were switched on to make sure it all worked.


I will keep you posted as we proceed to install the main cable and switching gear for the electrical distribution


Part 4

Below you will see the next stage in the construction of the engineering building we are currently working on.

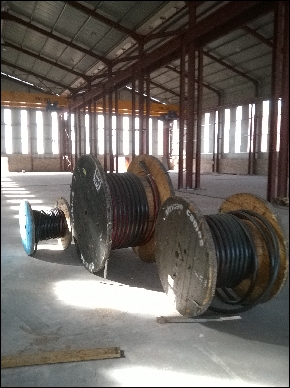
All the cables have been delivered and we are currently busy installing them. There are thin cables and then there are some major ones waiting for use to be dragged into place thru-out the engineering workshop. The really thick cables will be left for last, as they are the main incoming power cables.


Today we have dragged into place 500 meters of 16mm² cable and installed five 80A welding plugs, 450 meters of 2.5mm²  cable with seven  ordinary 220V plugs.

Many more cable dragging and installation awaits us next week.


Part 5

Below you will see the next stage in the construction of the engineering building we are currently working on.

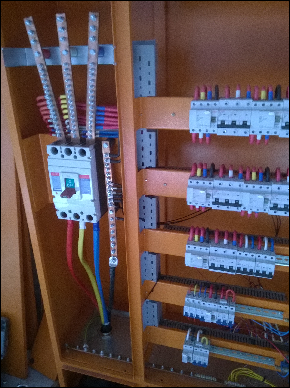
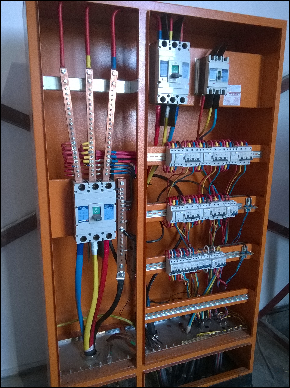
We have finally finished dragging in all the main cables and have also completed the wiring of the two main distribution boards in the engineering workshops. Below you will see the two main boards including the primary change-over switch for the diesel generator.{we suffer from severe rolling black-outs}.


Finaly, The End of the Project...

Below are the final screenshots of the engineering building we were contracted to electrify and wire some time ago. We have finally finished this building with the last two outside flood-lights being installed and connected.


The first image, starting from the top-left, is me wiring up the engineering shop's backup-generator. Our country's national electricity infrastructure is on the verge of collapse, which means we suffer from a lot of brown-outs. The second image is my father wiring the main office's air-conditioners. The third image is the outside flood-lights that we just installed and connected.

The last image is me wiring the Day-Night light switch for the outside flood lights. We have finally finished the engineering shop. For those who are wondering who took the photos... that would be my brother Marius{ also holding and cracking the whip as we work }.


---------------------------------------------------------------------------------------
Thursday, March 5, 2020

End the madness and STOP using proprietary document formats!

Free Word Processors from SSuite Office!You may have noticed that there are no docx or xlsx document formats supported in our applications. This is because in order to support any MS Office document format, we require a very expensive license {...in the million$...} from Microsoft for each format.

The reason for this is that they are all proprietary patented formats. So you may ask us this then; "...but what about the other open source, free, and retail office suites that claim to be 100% compatible?...". Well, their document formats are all cracked or reverse engineered versions of the original format and are NOT 100% compatible with the original MS Office document formats. None of them are, except Google Docs, as far as I know.

OpenOffice's own document formats are also not even compatible with other open source document formats of the same type. This is because the open source community never set a fixed technical specification's guide for their own document formats. So their formats odf / odt are also not 100% compatible with software supporting these formats.


--------------------------------------------------------------------------------
All Microsoft Excel documents created in SpreadForm One and Accel, are fully compatible with any spreadsheet application that can open and read the Microsoft Excel file format.

Our own presentation document format "SSP" can be opened by any current web browser. Just select the "Open..." option on the main menu and select the "*.*" document format and open your presentation file. This makes our presentation document format the most compatible with all systems and computers.

Using a compatible document format to play nice with everybody

If you need to create and exchange MS Word documents(*.doc) as a rule, then there is another way in staying completely compatible with everybody, no matter what software they use. This format is the most compatible document format currently available next to the rich text document format.
Simply save all your documents in MS Word or SSuite WordGraph in the following manner:


Only use RTF documents, Rich Text Format, from SSuite Office!When you save your documents, use this format...    Word 97-2003 & 6.0/95 - RTF (*.doc)


To simplify this procedure in MS Word, simply go to the "Tools >> Options..." menu item, and under the "Save" tab item, select your default document type as the above mentioned document type. This will ensure that all your documents will stay compatible no matter where you need to use them, either in MS Word or SSuite Office's WordGraph word processor. This procedure may also be used in Word 95 up to Word 2007.

 -----------------------------------------------------------------------
All Excel documents created in SpreadForm One and Accel, are fully compatible with any spreadsheet application that can open and read the Excel file format. Excel files created in Excel itself, are locked to prevent other office suites from being compatible with MS Office. To open these locked Excel files, follow the steps below.


Please Note! - This procedure cannot be used in Excel 2007 or Excel 2010. Microsoft does not support older formats in Excel 2007 and Excel 2010 that are below the standard Office 97. Click here for further details.

For compatibility with Excel, use the following method:

To make a Single Excel 97(or Higher - 2003) worksheet compatible with SSuite Office's SpreadForm One and Accel, follow these steps:
  1. Save your active Excel 97(or Higher - 2003) Worksheet as an Excel 4 Worksheet.
  2. Immediately save the same worksheet as an Excel Workbook, using the "Save As" function,  with a different name as the worksheet.
  3. You can now open your Excel 4 worksheet in SpreadForm One or Accel as an Excel spreadsheet.


Please Note - For further information, see the helpfile under "File Handling".

Saturday, February 22, 2020

How to create HTML5 documents in the new digital information age...

How to set yourself free from vendor-lockin...


In these times that we live in, when the online world-wide web merges with our own daily activities, everybody is being encouraged to learn some aspect of scripting, not to be confused with coding, it is important to start with the basics.

Image inserted by SSuite Office Fandango Desktop Editor
Before you start complaining that you don't want to use HTML5 for your documents or you don't know any other good reason as to why you should be using it as a document format, please read one of my more interesting articles on why you should be "Using HTML5 as a document format". You might get to be a bit smarter if you do!


Just FYI:

Coding is the creation of algorithms that perform calculations on data that is compiled into an executable program to run on a specific platform, while scripting is the writing of a set of instructions on how to present and/or retrieve information to or from a monitor display.
( This might upset some people, but I don't care, this is what I know is true! )


Since everybody interacts with the web on a constant basis, it is important to actually know what lays below all those web pages and web apps. So I am going to merge them both, showing you how to create HTML5 documents by adding some HTML and CSS scripting to help understand what each element does and how it can be used in your documents.


Image inserted by SSuite Office Fandango Desktop Editor
First off, there is the main HTML(Hypertext markup language) framework, add some styling to it, that would be the CSS(Cascading Style Sheet) language, and you have the basis of creating a very rich document content experience.

To make character attribute changes to your document text when using our editors, some of the changes require that you either select the text before clicking on the menu options e.g. Font Size, Font Colour, text background colour etc. or simply make your selection as you choose e.g. Heading Size, paragraph alignment, indentation without selecting your text.


It is mostly a trial by error user-interface action, but you will learn each function or feature quickly as you grow your experience with html scripting and css styling while using our editors.


In HTML, your most basic elements in any document that you create would be:
  • Font Size - 1 .. 7
  • Line break - <br>
  • Headers - <h1..h6> </h1..h6>
  • Standard hyperlink - <a href="url link">Click Here</a>
  • Paragraph - <p align="left / center / right / justify ">Paragraph </p>
  • Image - <img align="left / middle / right" src="url link" width="128" height="128">


If you have already used one of our online word processors or office suite, you will know just how easy it is to start creating and editing your HTML5 documents. It is almost exactly the same as any other desktop editor, with some slight differences.


Creating Physical or Digital Documents

With the advancements in web technology and browser functionality, it is now possible to choose between whether you want to create a document that is only for digital displays or for physical paper. It is no longer necessary to format information to only fit actual paper sized documents!

Image inserted by SSuite Office Fandango Desktop Editor
With our latest updates to Fandango and Blue-Velvet editors, you are now able to select the type of document you want to create. With digital documents, you only need to decide how the document should be viewed on-screen, the options being normal screen readable width, medium, or large width, depending on the information being presented inside the document. The same goes for physical paper documents.

As can be seen in the image, either a digital page or an actual paper sized document can be created. The selection range from a responsive screen based document or an A4 or Letter sized paper document with various margins may be selected from the menu options.
Simply make your selection and start creating your document. The margins for paper based documents are preset, so you don't have to worry about it. Set you printer margins to zero or none to make your document fit properly.


Some of the differences in the Headings and font size selection options...


Headings are categorized like below:
  • Heading One - <H1>

  • Heading Two - <H2>

  • Heading Three - <H3>

  • Heading Four - <H4>

  • Heading Five - <H5>
  • Subtitles - <H6>


When it comes to font size, your options look like this:

Desktop paper based font point size compared to web based font sizes:
  •  8 - Font Size 1 - Very Small
  • 10 - Font Size 2 - A Bit Small
  • 12 - Font Size 3 - Normal or Default size, usually 16px
  • 14 - Font Size 4 - Medium Large
  • 18 - Font Size 5 - Big / Large
  • 24 - Font Size 6 - Very Big / Large
  • 36 - Font Size 7 - Maximum Size


The typical structure of a HTML5 document or web page:
<!DOCTYPE html>
<html>
<title>HTML Tutorial</title>
<style type="text/css">
@import url('https://fonts.googleapis.com/css?family=Roboto:400:700&display=swap');
#PageDiv * {font-family:Roboto,Arial,Helvetica, sans-serif;}
</style>
<body>
<div id="PageDiv">
<h1>This is your main heading</h1>
<p>This is a paragraph. Place all your text and content here.</p>
</div>
</body>
</html>


To add some colour or font options to your content, there is CSS styling...
<style type="text/css">
@import url('https://fonts.googleapis.com/css?family=Roboto:400:700&display=swap');
#PageDiv * {font-family:Roboto,Arial,Helvetica, sans-serif;}
#PageDiv p, #PageDiv h1 {color:Gray;letter-spacing:1px;font-size:16px;line-height:185%;}
#mainpr {letter-spacing:3px;}
#extlnk {color:black !important;}
</style>


When using our editors and you decide to change any of the above elements in your document, never use them by themselves e.g. "p" or "a" alone, always give them an unique name e.g. <p id="mainpr"> or <a id="extlnk">, or rather reference them to the main element's identification name e.g. "PageDiv" — #PageDiv p, #PageDiv h1 {styling;}. This will prevent your document when loaded to interfere with the application or any other element in your document or web page. You may even use classes if you like, but only if you know enough of what to add or change.

Image inserted by SSuite Office Fandango Desktop Editor
If you read carefully on the CSS example, you would have noticed the"!important" attribute added at the end of the style declaration. This means that no other call to this attribute may override that declaration or make any changes. It's a kind of permanent setting declaration.

You would find all these attributes and how to change them with a single click in all our web editors, if you have not already explored them all.


If you want to have a better understanding of what it all means, you may go to the following website, which is where I go to do all my online learning...


This is a great and wonderful website that comprehensively teaches you on all of the elements and how to work with them.


So there you have it, by changing a few simple elements or adding some can make a difference to any document, whether it is colour, paragraph line spacing, or even character spacing, it is all just one click away.

The more you know on HTML and CSS scripting, the better your document content will present itself to your specific audience, or just have an overall look of professionalism that you desire.

Have fun...  


...Go Online and enjoy complete productivity freedom...


----------------------------------------------------------------------------------------